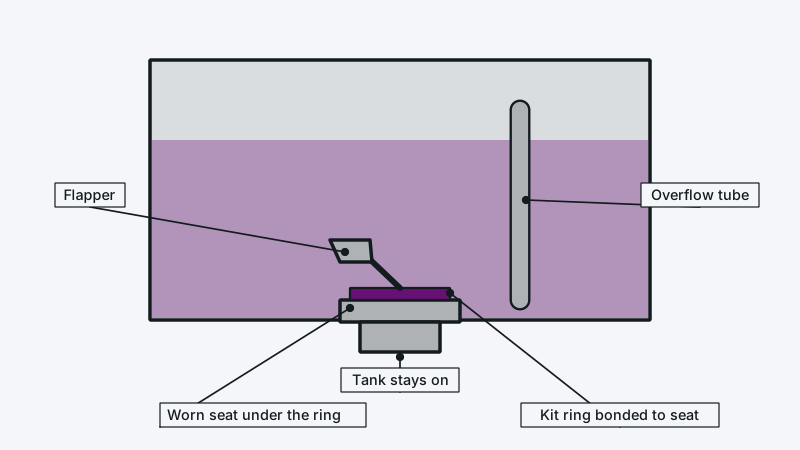
You cannot swap the whole flush valve without lifting the tank, because the valve passes through the tank floor and is held by a nut underneath, with a gasket between tank and bowl. What you can sometimes do is fix the sealing surface from inside the tank with a repair kit. Which route applies depends on why the valve leaks. This is a narrow job inside the wider topic of toilet repair, and it comes up when the tank is heavy, fragile or bolted to the wall.
Can you replace a toilet flush valve without removing the tank?
Not a complete replacement. A flush valve is a through-tank part, so a full swap means lifting the tank off a two piece toilet. A seat repair kit, which fits over the existing valve opening, can stop a leak at the flapper seat without lifting the tank, so that is the usual alternative.
The distinction matters. The flush valve does two things: it holds the flapper seat low in the tank and it carries the overflow tube. A rough, pitted or scaled seat on a sound valve body can respond to a surface repair. A cracked valve body, an overflow tube of the wrong height, or a leaking tank to bowl seal underneath means the tank has to come off.
What is a flush valve seat repair kit?
It is a small kit with a ring or sleeve that bonds or clamps onto the old seat, creating a new smooth sealing surface for the flapper. You clean the seat, apply the adhesive or press on the ring, and let it cure. Many kits are sold for this reason, with various designs, so check the fit against your toilet.
Typical steps, which differ by product, so follow the kit's own instructions:
- Close the water supply and empty the tank, so the seat is dry.
- Remove the flapper.
- Scrub the seat with the abrasive pad supplied, or fine wet sandpaper, until it is clean and level.
- Dry it and fit the ring or sleeve as directed.
- Allow the cure time on the pack before refilling.
- Fit a new flapper and test with food coloring.
Cure times and temperature limits are on the packaging, and they are worth reading, because a ring that is wet or disturbed while it cures will not seal.
When does the tank have to come off?
The tank has to come off if the flush valve body is cracked, the nut or gasket under the tank leaks, the overflow tube is too short, or the toilet is being rebuilt. Water seen at the base or bolts outside the tank is something no kit inside the tank can fix.
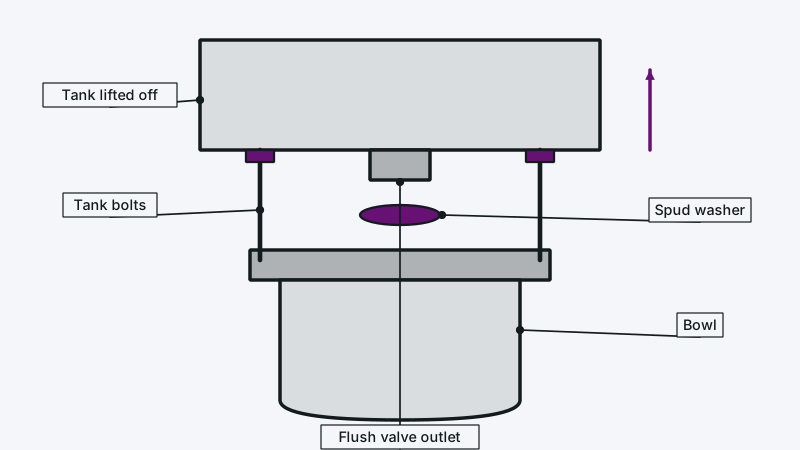
Lifting a tank is not difficult, but it is awkward and the porcelain cracks easily. The order is: close the water, empty the tank, detach the supply line, take out the bolts holding tank to bowl, raise the tank straight up onto a towel, undo the locknut, replace the valve and gasket, then put it all back. One repair guide describes the same sequence and says a tank whose overflow tube is too short needs a new flush valve assembly. Expect an hour or more the first time.
Be extra careful if:
- The tank bolts are rusted. They can snap or spin without loosening.
- The toilet is older than about the 1960s and the porcelain is crazed or chipped.
- The toilet is wall hung or a one piece design. Those cannot be handled like a standard two piece toilet.
In older Burbank homes, a toilet may have been set in place for decades. If the tank has been painted or caulked to the wall, hold off and ask for help.
How do you know the seat, not the valve, is the problem?
With the tank empty, run a finger around the seat. Pits, ridges or crust mean the seat is the problem. A flapper that was replaced and still leaks into the bowl, with dye-test color appearing within ten minutes, points to the same thing.
Work through the checks in this sequence:
- Start by replacing the flapper, the cheaper fix that works most of the time. Our guide to toilet flapper repair shows how.
- If a new flapper still leaks, clean the seat with a non-scratching pad.
- If the seat is still rough, fit a seat repair kit or replace the flush valve.
- If there is water outside the tank, treat it as a leak and look at leaking toilet repair.
The EPA lists worn flappers as a common cause of silent leaks and advises replacing them at least every five years. A rough seat shortens a new flapper's life if it is left as is.
Is it worth fixing the old flush valve or replacing the toilet?
With a solid toilet and sound porcelain, repairing or replacing the flush valve costs less. A cracked toilet, one that uses a lot of water per flush, or other work already being priced can tilt the choice toward a new toilet. Compare quotes before deciding.
Our page on toilet replacement cost outlines what a new toilet involves. Toilets sold in California today are capped at 1.28 gallons a flush, and the EPA says WaterSense labeled models in place of old toilets can save the average family about 13,000 gallons of water a year. That is an average, so your own saving depends on your toilet's age and how many people use it.
How much does flush valve replacement cost?
Parts are cheap, and labor makes up most of the price. A plumber replacing the flush valve with the tank lifted usually bills hourly plus any service fee. National guides put rates at about $45 to $200 an hour, and a visit often carries a minimum, so request a written quote.
Price changes with these factors:
- Access: a tank pushed tight against a wall or cabinet takes longer.
- Condition of bolts and shutoff valve: a seized shutoff valve may need replacing at the same visit.
- Parts: a standard valve is cheaper than one for a specific tank.
- Whether the toilet is a standard two piece model.
How hourly rates and trip fees work is explained under hourly plumber costs. Read every figure as a rough guide, with the plumber confirming the price once the toilet has been seen.
When should you call a plumber?
Phone a plumber when the tank bolts are corroded, the shutoff valve will not close, the tank or bowl shows cracks, or a repair kit failed to stop the leak. Help is also wise with a wall hung toilet, or when risking a heavy porcelain tank lift does not appeal.
The visit takes place at your home in Burbank, Glendale, Sherman Oaks or elsewhere in the Valley, and the price reaches you in writing before anything starts. Request a quote and give the make of the toilet if you know it. The Lankershim Plumbing home page shows what else we arrange.
Questions people ask
Can I fix a leaking flush valve without draining the tank?
No. The tank must be empty so the seat can be cleaned and dried and the old parts lifted out safely. Shut the valve at the wall, flush the tank dry, and sponge out what remains. A kit will not bond underwater, and the old parts are hard to see.
How long does a flush valve seat repair kit last?
It depends on the product, the water and how well the seat was cleaned. Hard water and chlorine tablets in the tank affect results, so read the maker's notes before buying. Should a repaired seat leak again, replacing the whole valve is usually the better long term fix.
Can I replace a toilet flush valve myself?
For anyone comfortable with tools, yes. The work means lifting the tank, replacing the valve and gasket, and refitting the tank without cracking it. Seized bolts, a cracked tank or a stuck shutoff valve are signs to stop, and a plumber can take over without costing you the whole afternoon.
What does a toilet flush valve cost?
The part costs little beside the labor, though prices vary by toilet design and brand. The plumber's visit is usually the bigger cost, so bundling a flush valve replacement with other toilet fixes, such as a fill valve or a new shutoff valve, is worthwhile.
Why would a flush valve fail?
Rubber seals harden, mineral scale builds on the seat, and rust or cleaning chemicals attack the parts over time. Hard water speeds this up. Most failures show up as a toilet that refills on its own, which the dye test confirms.
References
Updated